
Handyman Sandblasting Cabinet
by Louis Boucher
The cabinet described here is the practical solution for those looking for efficient blasting chores without spending all their “Triumph dollars” and their shop space. It has a robust 0.75-inch plywood construction sitting on a 2 x 4 lumber frame. Its interior is lined with galvanized sheet metal used for duct work. A supporting shelf as well as a light complete the interior of the cabinet. Access is provided via two sleeves made of 4-inch ABS connectors, a few feet of dryer exhaust hoses attached to a pair of rubber gloves. The laminated glass was salvaged from a retired Econoline van. Aside what you have to build, there are a few basic components required. A simple sandblasting gun, a 4–5 HP compressor, and a good shop vacuum will complete your sandblasting rig.
The cabinet described here is the practical solution for those looking for efficient blasting chores without spending all their “Triumph dollars” and their shop space. It has a robust 0.75-inch plywood construction sitting on a 2 x 4 lumber frame. Its interior is lined with galvanized sheet metal used for duct work. A supporting shelf as well as a light complete the interior of the cabinet. Access is provided via two sleeves made of 4-inch ABS connectors, a few feet of dryer exhaust hoses attached to a pair of rubber gloves. The laminated glass was salvaged from a retired Econoline van. Aside what you have to build, there are a few basic components required. A simple sandblasting gun, a 4–5 HP compressor, and a good shop vacuum will complete your sandblasting rig.
Let's get the materials. Here is what you will need. From the lumber yard: 1 sheet of 0.75-inch plywood; 24 feet of 2 x 4; and 8 feet of 1 x 6. From the plumbing / heating department: 16 square feet of galvanized sheet metal; two 4-inch ABS connectors; 4 feet of 4-inch dryer flexible hose; and one 4x10 inch register adapter. The other items you will need are: a pair of long rubber gloves; a piece of wardrobe shelving; a sealed exterior lighting fixture; a pair of hinges; the glass from that salvaged Econoline van; and of course some duct tape for the glove / sleeve arrangement.

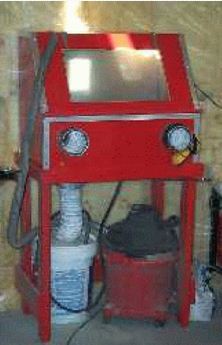
The view of the interior of the cabinet shows the sheet metal lining that is critical for the longevity of the cabinet. You can notice the drainage for the blasting media via the register adaptor on the left bottom which is actually pitched toward this area. The shelf is supported by small brackets. The lighting fixture ( with the lense removed for the picture ) avoids working in the dark, in the dust I must say! Please pay attention to the sophisticated arrangement of the glove compartment. The key here is the proper alignment of the thumbs. If you want to get fancy, you can also protect all corners with aluminum angles as in mine.
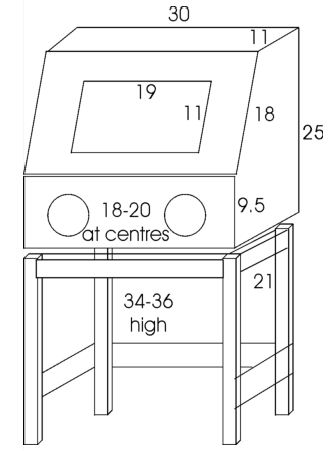
The construction is straightforward. First, you have to build the upper box, the door / window assembly and the bottom. It is now time to assemble the base that will receive the upper cabinet. Then the lining gets in, this is where you practice your sheet metal skills (no bondo allowed)! I would recommend that you paint the cabinet and base at this point. This cabinet is big enough to clean 15-inch wheels and major components. The measurements shown here are for reference only and represent approximate outside dimensions (in inches). You do not have to restrict yourself to these but they are quite proportional and practical.
The construction is straightforward. First, you have to build the upper box, the door / window assembly and the bottom. It is now time to assemble the base that will receive the upper cabinet. Then the lining gets in, this is where you practice your sheet metal skills (no bondo allowed)! I would recommend that you paint the cabinet and base at this point. This cabinet is big enough to clean 15-inch wheels and major components. The measurements shown here are for reference only and represent approximate outside dimensions (in inches). You do not have to restrict yourself to these but they are quite proportional and practical.
You are now ready for the “glove compartment” fitting and plenty of duct tape. The shelf, light and gun supply lines ( air input and sand pick up ) are finally fitted. Do not forget to drill the hole to receive the vacuum pick-up, this is essential. You are now ready, fill the pick-up bucket with blasting media, connect the air supply, turn on the light and vacuum, and pull the trigger. WOW !!!
I wish you good luck with this project.
I wish you good luck with this project.