Accelerator Shaft Bushing TR6
by Michael Graham
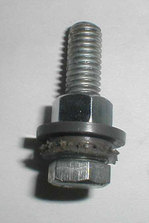
Many people had warned me about how much trouble these little plastic bushings were to install. After doing some research on the various Triumph lists on the Internet, I discovered a few tricks I thought I would pass on to others. Of course, the bushings are easier to put in when the engine is out! However, two things did make installation easier. First, I reduced the diameter of the “wall” of the bushing on one side (the one you push into the hole in the bulkhead). I reduced it from its stock diameter of 0.90 inches to about 0.75 inches. You can do this easily by putting a 3/8 inch bolt through the bushing and locking it in place on the bolt with a nut (see Figure 1). The bolt can then be held in a hand-held drill or drill press, while the bushing is filed down to size as it turns in the drill. After one side is reduced in size, the bushing should be soaked in boiling hot water to soften it a bit before you press it into place. With the side that is to be inserted reduced in diameter, the bushings are much easier to insert and there is still enough material to hold the bushing in place.
Many people had warned me about how much trouble these little plastic bushings were to install. After doing some research on the various Triumph lists on the Internet, I discovered a few tricks I thought I would pass on to others. Of course, the bushings are easier to put in when the engine is out! However, two things did make installation easier. First, I reduced the diameter of the “wall” of the bushing on one side (the one you push into the hole in the bulkhead). I reduced it from its stock diameter of 0.90 inches to about 0.75 inches. You can do this easily by putting a 3/8 inch bolt through the bushing and locking it in place on the bolt with a nut (see Figure 1). The bolt can then be held in a hand-held drill or drill press, while the bushing is filed down to size as it turns in the drill. After one side is reduced in size, the bushing should be soaked in boiling hot water to soften it a bit before you press it into place. With the side that is to be inserted reduced in diameter, the bushings are much easier to insert and there is still enough material to hold the bushing in place.
Figure 1: Plastic bushing held in bolt to allow easy filing of one side of bushing.
There was still a problem, however. I found that after I had the two bushings in place, the accelerator shaft would not go back in because there was not enough room in the foot well to get it straight enough to push it back through the bushing. (I was able to remove the shaft because the bushing was gone and there was enough slack to manipulate the shaft in the foot well.) With the new bushings in place, the shaft did not have enough clearance and could not be reinserted. Further research suggested removing the brake and clutch pedals to get the shaft in place. I chose not to do that. I did try inserting the bushing with the shaft in place, but I can’t see how that can be done (although some have claimed success with this procedure, it seems to defy the rules of physics).
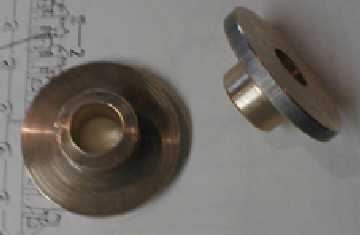
So being rather unhappy (mild version of my true feelings!) at this time, I decided to seek another solution. I made some measurements with my new digital caliper and set out to design a replacement bushing that could be installed with the shaft (and engine) in place. After I had made a simple sketch, I visited a local machine shop and had a pair of bushings made out of hardened bronze (see Figure 2).
Figure 2: Prototype bronze bushings for TR6 accelerator shaft.
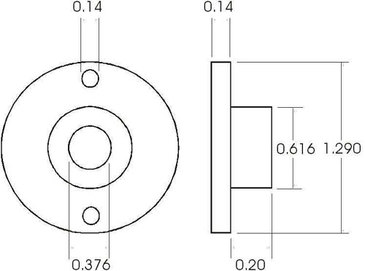
The machining charge was $20 (about the same as the plastic version), and installation was very easy. You can reinsert the shaft easily because the bushings are not in place. Simply slide the bushings over the shaft and attach them to the bulkhead. I used pop rivets to hold the bushings in place. I think I might use self-tapping screws or small bolts if I did it again, because I found that the rivets “pulled” the bushings a little out of alignment. Bolts or screws might offer more flexibility when attaching the bushings. I have not road tested the bushings yet, but they appear to work just fine and I expect they will outlast the plastic equivalents by a great deal. For those that might be interested in making their own bushings in bronze (or other materials), here are the dimensions (in inches) I used for mine (see Figure 3).
The machining charge was $20 (about the same as the plastic version), and installation was very easy. You can reinsert the shaft easily because the bushings are not in place. Simply slide the bushings over the shaft and attach them to the bulkhead. I used pop rivets to hold the bushings in place. I think I might use self-tapping screws or small bolts if I did it again, because I found that the rivets “pulled” the bushings a little out of alignment. Bolts or screws might offer more flexibility when attaching the bushings. I have not road tested the bushings yet, but they appear to work just fine and I expect they will outlast the plastic equivalents by a great deal. For those that might be interested in making their own bushings in bronze (or other materials), here are the dimensions (in inches) I used for mine (see Figure 3).
Figure 3: Dimensions of prototype TR6 accelerator shaft bushings.
These bushings are easy to install (with or without the engine in place) and after about 1500 miles of driving, they are functioning very well.
These bushings are easy to install (with or without the engine in place) and after about 1500 miles of driving, they are functioning very well.


