Rather Safe Than Sorry
by Michael Graham
There are numerous horror stories of people having to go to great lengths to open the hoods (bonnets) on their TR6s if the cable release breaks. Some time ago I decided to be safe rather than sorry. Here is the approach I took to installing a supplementary hood release.
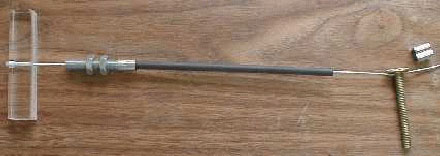
This is a very inexpensive fix as the total cost was less than $2. The cable I used came from Princess Auto and accounted for the entire cost of the project. This particular cable came with a threaded portion that I secured to the firewall (actually the inside of the passenger side footwell) with two nuts. See Figure 1 for the overall layout of the release mechanism. I shortened the cable to about 6 inches by carefully cutting the plastic external sheath and then cutting the inner steel cable about 2 inches longer than the plastic outer sheath (total length is therefore about 8 inches). The handle for the release was made from the plastic bottom of an old trophy. Two holes were drilled in the handle to hold the steel cable. The smaller hole allows the steel cable to pass through; the second hole runs about half way down the first hole to allow the crimp at the end of the cable to "lock" in place (see Figure 1). The other end of the release features a brass bolt used to hold a household toilet to the flange on the floor. A hole was drilled into the bolt (close to the flat surface) to allow the steel cable to pass through and a coupler for a clothesline was used to finish the end of the cable so it would not unravel.
Figure 1: Components of the supplementary hood release.
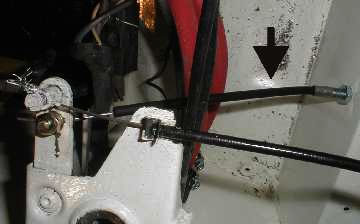
I drilled a hole in the arm of the hood release mechanism to accommodate the attachment bolt. This turned out to be the most difficult part of the project because this piece is very hard and proved to be extremely resistant to sharp, new drill bits. Eventually, though the drills won. Next it was just a case of feeding the assembly in from the passenger side footwell, tightening the nut holding the cable in place, and snugging up the bolt holding the cable to the release arm (see Figure 2). This arrangement gives a very direct pull on the arm and makes the hood release very easy to pull.
I drilled a hole in the arm of the hood release mechanism to accommodate the attachment bolt. This turned out to be the most difficult part of the project because this piece is very hard and proved to be extremely resistant to sharp, new drill bits. Eventually, though the drills won. Next it was just a case of feeding the assembly in from the passenger side footwell, tightening the nut holding the cable in place, and snugging up the bolt holding the cable to the release arm (see Figure 2). This arrangement gives a very direct pull on the arm and makes the hood release very easy to pull.
Figure 2: Supplementary hood release installed (the arrow shows the new cable).
I have not been forced to use this new release in an emergency, but have tried it several times and it works very well. It is worth the few minutes it took to make and install for the peace of mind it provides.
I have not been forced to use this new release in an emergency, but have tried it several times and it works very well. It is worth the few minutes it took to make and install for the peace of mind it provides.


