
TR6 Plenum Drain Hose Modification Revisited
by Chuck Hobbs
There are several well-known Triumph TR 6 engineering deficiencies including, but not limited to, the front hood (bonnet) release cable, rear differential bolts, clutch fork bolt, and the front plenum drain hoses. Failure to address these issues will, over time, result in bigger issues with your car.
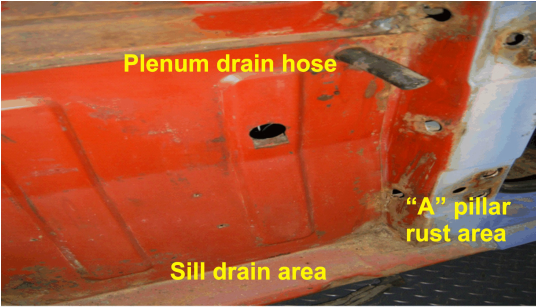
The TR6 plenum drain hose was supposed to drain water from the front scuttle and ultimately deposit the waste water on the road. The drain hoses (The Roadster Factory (TRF) TR6 Green Book part FB5) run from the scuttle corners through the bulkhead end panels (RTF FB2) and end in the upper cavity space between the inner (TRF FB23) wheel arch panel and the outer (TRF FB30) wing (fender). The water then drains down between these panels and ultimately is supposed to exit the car through a 1/4 inch by 2 inch pressed gap in the edge of the outer sills (TRF FC5). Unfortunately, there are a number of issues with this design, including the poor quality of the 1970’s rust proofing on these interior panels, and a tendency for water to remain inside the cavity, often collecting at the intersection of the inner and outer fenders and the inner (TRF FC11) and outer (TRF FC13) front door posts (the A pillar). This area provides an ideal damp environment for rot and rust corrosion issues at the base of the A pillars and the sill seams, resulting in significant hidden structural issues that only become visible and repairable during a major rebuild of the car.
There are several well-known Triumph TR 6 engineering deficiencies including, but not limited to, the front hood (bonnet) release cable, rear differential bolts, clutch fork bolt, and the front plenum drain hoses. Failure to address these issues will, over time, result in bigger issues with your car.
The TR6 plenum drain hose was supposed to drain water from the front scuttle and ultimately deposit the waste water on the road. The drain hoses (The Roadster Factory (TRF) TR6 Green Book part FB5) run from the scuttle corners through the bulkhead end panels (RTF FB2) and end in the upper cavity space between the inner (TRF FB23) wheel arch panel and the outer (TRF FB30) wing (fender). The water then drains down between these panels and ultimately is supposed to exit the car through a 1/4 inch by 2 inch pressed gap in the edge of the outer sills (TRF FC5). Unfortunately, there are a number of issues with this design, including the poor quality of the 1970’s rust proofing on these interior panels, and a tendency for water to remain inside the cavity, often collecting at the intersection of the inner and outer fenders and the inner (TRF FC11) and outer (TRF FC13) front door posts (the A pillar). This area provides an ideal damp environment for rot and rust corrosion issues at the base of the A pillars and the sill seams, resulting in significant hidden structural issues that only become visible and repairable during a major rebuild of the car.
All the fixes that I have seen involve replacing the existing short rubber hose by installing a longer hose which will take the water completely out of the inner fender area. Two different designs have been proposed by others.
1. In his book “How to Restore Triumph TR5/250 and TR6” Roger Williams explains a process (figure 4-5-9) that replaces the existing hose with a longer hose that is then passed through a 3/4 inch hole drilled in the top of the outer sill, and a second hole drilled through the inner sill plate, so the hose can then exit underneath the car on the inside (at the side?) of the frame. Although a nice looking, mostly hidden solution, this modification can only be done if the outer front fender has been removed, and it requires that two holes be drilled into the outer and inner sills. As the sills are expensive to buy and replace, and they get a significant amount of water from the road already, my preference was not to put two additional holes into them.
2. An alternative modification also involves replacing the original short drain hose with a longer one that is subsequently brought out through the front fender bulkhead splash plate (TRF FC28), depositing the waste water just behind the front tires. I believe the original idea was proposed by Paul Rego and written up by Tom Chimenti (both from the 6 Pack club), and was featured in an article in the Toronto Triumph Club Ragtop 2010 Summer Issue pages 16 and 17. This solution has the advantages that it does not involve drilling holes through the sill plates, could possibly be done without removing the fenders, and bulkhead splash panels are much cheaper and easier to replace than sills. The end of the drain hose is covered by a 1964-66 Ford Mustang rear quarter panel rubber drain plug, which nicely covers the end of the hose, but more importantly, prevents road water from being blown back up the drain hose.
To simplify installation, it is best that your front fenders are off the car, but theoretically this modification could be done by removing your bulkhead splash panels and working in between the inner and outer fender panels. The parts and tools needed are:
Installation starts with removing the plastic grill or vent door (TRF FB8) from the scuttle, allowing you to clean (and possibly unplug) the vent areas of the plenum. It also makes sense at this stage to prevent further issues by rust proofing this area with a product such as POR-15, using a small brush or pad on a long flexible stick. Use a small bucket to collect any rust proofing that drips through the existing drain hoses. When the rust proofing has dried, you can remove the existing drain hoses, accessing them from underneath and behind the dash. When removed, feed the end of your vinyl hoses through the existing hole in the bulkhead end panels, place the hose clamps over the end of your vinyl hoses, and then slip the hose and clamp over the nipples at the end of the plenum drain and secure by tightening the hose clamp.
The Mustang drain plugs require three holes to be drilled in your splash shields. The larger centre hole (approximately 5/8 inch in diameter) is for the vinyl hose, and should be slightly undersized so that it “grabs or bites” the vinyl hose and holds it in position. Both the lower 5/16 inch diameter hole for the drain plug pin and the upper 3/8 inch diameter pin hole should be drilled one inch (total two inches on centre between the two pin holes) centre to centre with the larger hose hole, but you should confirm these diameters and distances with the actual plugs and hose you buy. The hose drain hole should be located on the lower part of the splash shield, approximately four inches from the bottom (midway between the two 1/2 inch diameter lower inner bolt holes) and centred on the splash plate. A vertical placement of the three holes, rather than paralleling either of the angled splash shield sides looks best.
- 5/8 inch outside x 1/2 inch inside diameter vinyl hose available from Lowes (by the foot or Home Depot ten foot roll) or any auto parts store. About 3 feet are required for each side, so 6 feet total.
- Two small 3/4 inch hose clamps to fit over the hose.
- Two 3/4 inch wire clips from Home Depot.
- Two 1/4 inch machine screws, split lock washers, and nuts.
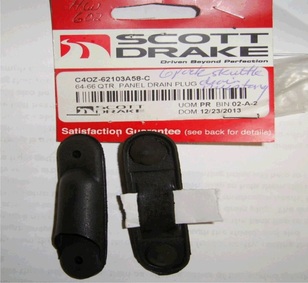
- Two 1964-1966 Ford Mustang Rear Quarter Drain Plugs. This is Part number 11202-01 from Mustangs Unlimited.com or Part number C40z-62103A58-C from Scott Drake.
- Body sealant or caulking of your choice.
- Rust proofing agent such as POR-15.
- Body sealant such as 3M body sealant.
- Metal cutting step drill bit (up to 3/4 inch) to drill the hose hole.
- 1/4, 5/16, and 3/8 inch drill bits and electric drill.
Installation starts with removing the plastic grill or vent door (TRF FB8) from the scuttle, allowing you to clean (and possibly unplug) the vent areas of the plenum. It also makes sense at this stage to prevent further issues by rust proofing this area with a product such as POR-15, using a small brush or pad on a long flexible stick. Use a small bucket to collect any rust proofing that drips through the existing drain hoses. When the rust proofing has dried, you can remove the existing drain hoses, accessing them from underneath and behind the dash. When removed, feed the end of your vinyl hoses through the existing hole in the bulkhead end panels, place the hose clamps over the end of your vinyl hoses, and then slip the hose and clamp over the nipples at the end of the plenum drain and secure by tightening the hose clamp.
The Mustang drain plugs require three holes to be drilled in your splash shields. The larger centre hole (approximately 5/8 inch in diameter) is for the vinyl hose, and should be slightly undersized so that it “grabs or bites” the vinyl hose and holds it in position. Both the lower 5/16 inch diameter hole for the drain plug pin and the upper 3/8 inch diameter pin hole should be drilled one inch (total two inches on centre between the two pin holes) centre to centre with the larger hose hole, but you should confirm these diameters and distances with the actual plugs and hose you buy. The hose drain hole should be located on the lower part of the splash shield, approximately four inches from the bottom (midway between the two 1/2 inch diameter lower inner bolt holes) and centred on the splash plate. A vertical placement of the three holes, rather than paralleling either of the angled splash shield sides looks best.
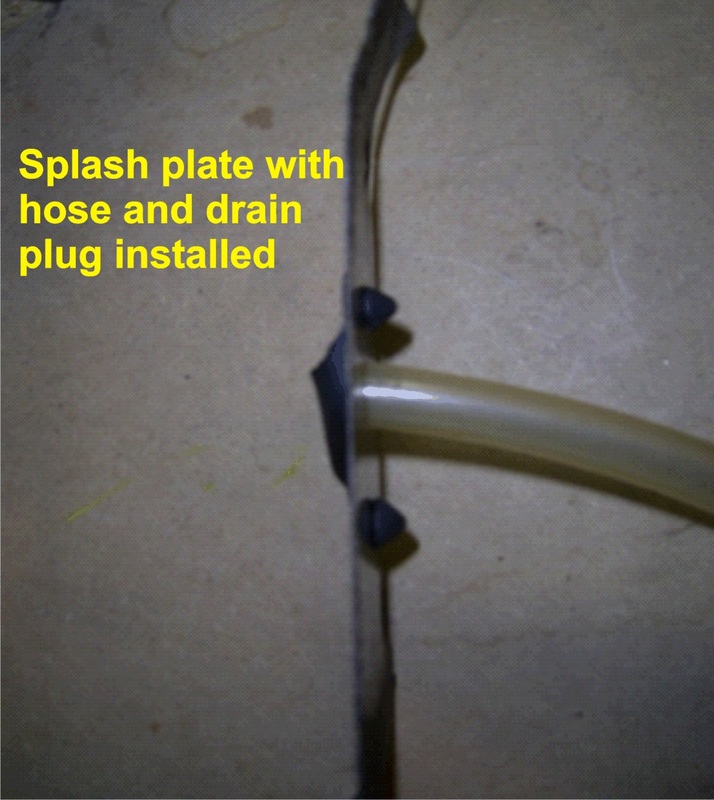
Do a dry fit of how the hose runs through the inner fender cavity, cutting the hose to the correct length and leaving about 1/2 inch sticking through the shield, and also ensuring the hose has no kinks or slack bends. The drain plug requires the back flap to be trimmed away using scissors, to allow the drain hose to fit within the drain plug. The drain plug can then be installed onto the splash shield by pushing the two “mushroom heads” into the upper and lower pin holes. You may need to use a little dish soap to help them slip into position. A little body sealer around the drain plug and the mounting holes will help to prevent any moisture from getting in.
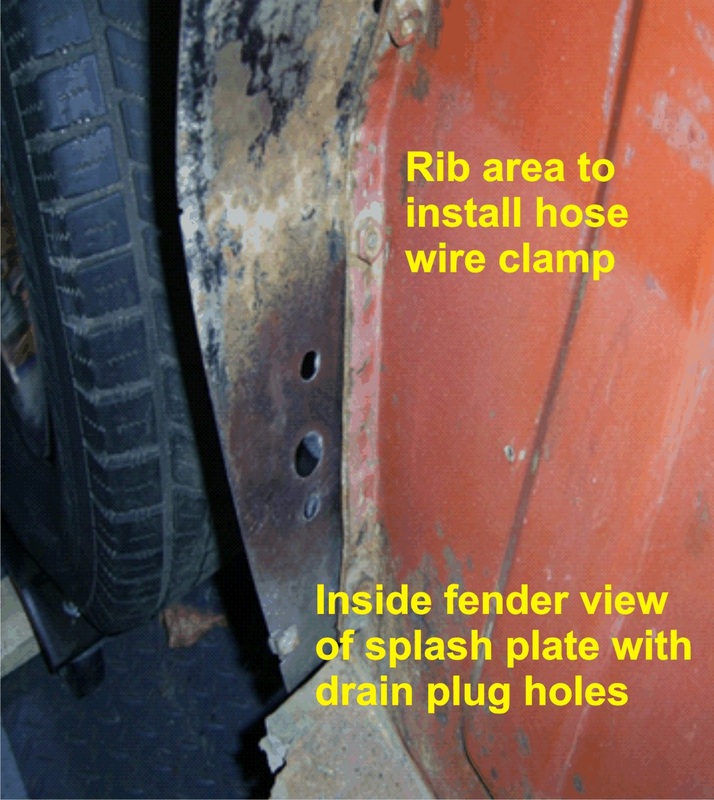
The 3/4 inch wire clamp is used to secure the hose to the bulkhead end panel, drilling a 1/4 inch hole through the "ribbed" areas so the bolt head will not interfere with the interior kick panel (the area about 8 inches up and 5 inches in looks about right). Use a fender washer on the bolt head and a split lock washer and nut on the hose side. The area of the bolt hole should also be sealed with 3M body sealant. Finally, you can re-assemble your fenders.
In doing the research for the splash guard solution above, I wondered whether there might be a simpler solution that did not involve drilling holes into the car. Having my fenders off, my first thought was to simply squeeze the longer vinyl hose flat and push it through the existing sill drain hole, but I found the vinyl wall thickness effectively blocked the interior hose hole when flattened to 1/4 inch thick. I then considered using thin wall tubing, and did some trial work with 1/2 inch copper water tubing. This provided a proof of concept, but I wanted to avoid the electrolysis issues that mixing copper and steel would cause. The solution was to use thin wall 1/2 inch steel electrical conduit tubing. The local Lowes and Home Depot store sell a 1/2 inch 90 degree elbow about 12 inches long for less than $5.00, which allowed me to make two drain fittings, and the vinyl hose fits perfectly inside.
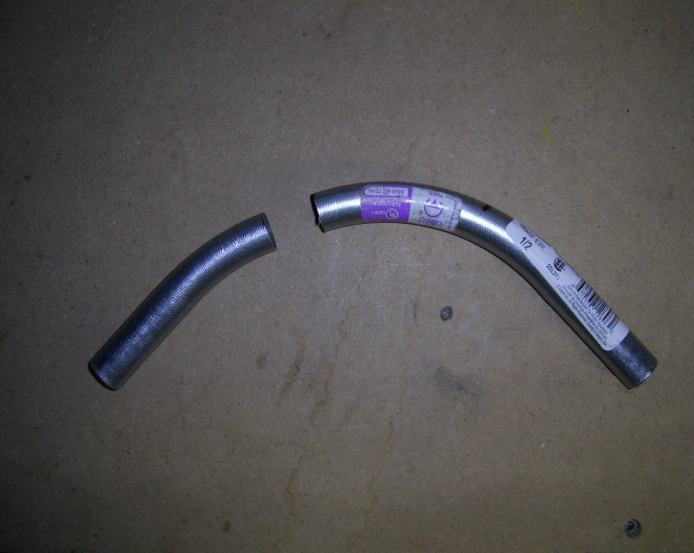
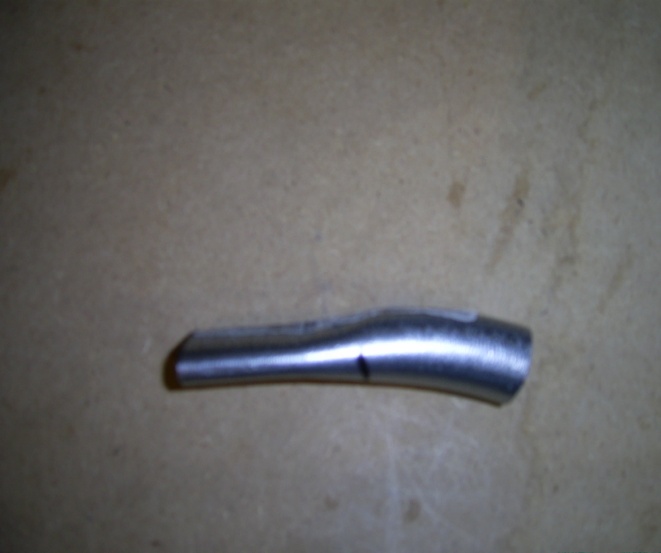
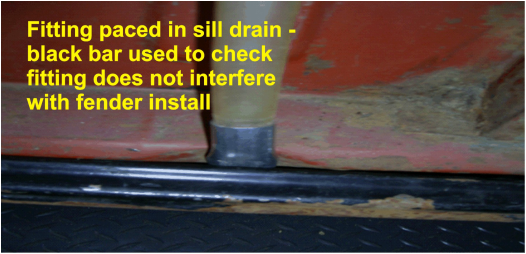
I cut off a four inch section from each end of the elbow, which provided me a straight section with a slight bend on the top to follow the curve of the outer fender and allow clearance for the vinyl hose. About 1.5 inches down from the curved part, I started to flatten the tubing to 1/4 inch thick, using my vice for the bulk of the work. A few careful hammer blows helped as well. A flat metal file inserted into the flattened tubing helped to keep the now flat walls straight and parallel. After checking the fit, I cut off about 3/4 inch from the bottom flat part so the fitting did not protrude below the fender edge. I placed the new fitting under a flowing tap to ensure there was no restriction in the water flow – definitely not an issue. Lastly, I did a final check with a black metal bar to ensure the fitting would fit into the sill drain hole without interfering with the outer fender fit.
The remaining repair is as detailed for the Mustang splash plate, but instead of running the longer vinyl hose forward to the splash plate, you run it straight down to the new fitting. Given the almost vertical run of the hose to the fitting, I do not think it requires the hose clamp in the previous solution. With the proper hose length, the fitting should stay in place, but it could be glued in place with silicon or other sealer, or tacked to the sill if you have access to a welder. A little primer and touch up paint on the drain fitting, re-hanging the fender and you are done.
Although I have not tried it, I believe it would be possible (with difficulty because of the limited working area) to do this repair without removing the outside fender. Support the frame and remove the front tire and splash plate to give access to the interior fender space, and then complete as detailed above. It also seems possible to do a partial repair by not replacing the existing drain hose, but rather extending it with 18 inches of vinyl hose and the fitting. The challenge is to find a coupling that goes over both the existing hose and the new hose, as the existing rubber hose is slightly larger in diameter than the vinyl hose so more of the electrical tubing cannot be used for the connection. Trying to thin down the existing hose by grinding or filing the outside to reduce its diameter is probably impossible inside the tight working area. The best solution I found was a white 90 degree 3/4 x 1/2 inch PVC water pipe fitting (Lowes 277607 for $1.50). The vinyl hose fits perfectly into the smaller 1/2 inch end, and the rubber tubing wrapped with a few layers of black plastic electrical tape fits tightly into the larger 3/4 inch end. A little silicon or five minute epoxy would ensure that neither hose would disconnect from the fitting. Either repair can be done for approximately ten dollars worth of bits and pieces, and will correct what has been a major design fault with the car.
Although I have not tried it, I believe it would be possible (with difficulty because of the limited working area) to do this repair without removing the outside fender. Support the frame and remove the front tire and splash plate to give access to the interior fender space, and then complete as detailed above. It also seems possible to do a partial repair by not replacing the existing drain hose, but rather extending it with 18 inches of vinyl hose and the fitting. The challenge is to find a coupling that goes over both the existing hose and the new hose, as the existing rubber hose is slightly larger in diameter than the vinyl hose so more of the electrical tubing cannot be used for the connection. Trying to thin down the existing hose by grinding or filing the outside to reduce its diameter is probably impossible inside the tight working area. The best solution I found was a white 90 degree 3/4 x 1/2 inch PVC water pipe fitting (Lowes 277607 for $1.50). The vinyl hose fits perfectly into the smaller 1/2 inch end, and the rubber tubing wrapped with a few layers of black plastic electrical tape fits tightly into the larger 3/4 inch end. A little silicon or five minute epoxy would ensure that neither hose would disconnect from the fitting. Either repair can be done for approximately ten dollars worth of bits and pieces, and will correct what has been a major design fault with the car.